Thursday, December 12, 2013

It's Beginning to Look a Lot Like Christmas... Unfortunately

Today it is COLD. Far, far too cold for me to find any joy in how pretty the snow looks outside. (According to weather.com, it's currently 14 degrees, but it feels like 1 degree. THAT IS TERRIBLE. Man, one of these days, I'm going to have to move to California or Florida, or, you know, anywhere on the equator.)

In keeping with the season, however, we've been busy decorating our room with all sorts of snowy decor. Pictures are below, please take a look! (Also, the formatting on the captions went completely wonky, I have NO idea what happened, and I do not have even a little bit of motivation to fix it. Haha, I know, I am SUCH A GOOD BLOGGER.)

Miss Beth made a street lamp (reminiscent of Narnia, obviously) in front of our pole opposite the entrance. I love the way the branches turned out - they add just the right fanciful element!
We made several of these big snowflakes to lend the room some added flair. This one is my favorite, although the picture is a little hard to make out. Find a tutorial on how to make these here!
I would just like the record to state that I very kindly did NOT play candid camera, and instead allowed Miss Jan to sneak out of the picture as I snapped it. Pretty garland though!
And a nicely-decorated Christmas tree, of course!
We cut a sponge into a snowflake shape and used it to paint the windows, then added some paper chains for an added touch of winter white.
Miss Jan put together this adorable Pete the Cat bulletin board! Hip, Hip Hooray for the Holidays! (Idea originally from Mudpie Studio.)
Miss Jan ALSO put together this awesomely hilarious bulletin board. Everyone loves Buddy the Elf! (Idea originally from Close's Counselor Corner)
More painted snowflakes, plus some hanging ones and a lovely poinsettia!

I found some really gorgeous wrapping paper at a craft store, so we used it to make some of our snowflakes. After we had punched them out, we thought, why not use the outlines as well!
We wrapped a center pole with some pretty wrapping paper. We had initially envisioned doing the whole room in blue and white, but I really like the pop of color the red offers!
Miss Kim made some awesome stack-end snowflakes!


So pretty! (I think the glittery one is especially nice. See more closeups on Miss Kim's Blog: Destination Storytime!)

Santas, santas everywhere!
And a shot of the room (as best I could manage) to give you more of an idea of how it all fits together! It's quite pretty down here, I'm liking this seasons decorations, even if I AM already pretty sick of snow.
And this is what I've been working on for the past couple days! I really, really love how it turned out, and it wasn't that had to make either. I just punched out the letters, did my best to make everything as bright and contrasting as possible, and then hung the words + circles from the ceiling on fishing line, so everything looks like it's floating! (Seriously, taping paper decorations to fishing line is my new favorite decorating tool. So simple, but it looks really good when you're all finished! If I do say so myself.)

 
Here's a closeup! Oooooooooh, floating circles!

And a picture from the back, just so you can get more of an idea of how everything is precariously held together. (It hasn't fallen down yet! I'm counting this as a victory.)

   And that's all for now, folks! A quick, picture-heavy blog post to (hopefully) get me back in the swing of posting again. (I can't believe I haven't had a post up since JUNE, ugh, that is terrible.)


Friday, June 28, 2013

SRP 2013: Dig into Reading!

Hello, hello, everyone - long time no talk! As I assume is true for children's librarians everywhere, we have been intensely busy ever since the first week of June and the kick-off of this year's summer reading program. It's a good busy though! We're at 1400 signups and counting, and we've had excellent turnout for our Wacky Wednesday program, which I am once again running with the help of the lovely Miss Jan. We're now finishing up our second week of programming, which means I am already behind on updates, hah. Story of my life.

To start with though, I thought I'd do a post on some of our awesome decorations - I'm so thrilled with how everything turned out, and we had a LOT of fun with this year's theme!

Overall, we went with an Egyptian theme for our children's room. I'll say that the room as a whole probably isn't quite as decked out as previous years (for example, those years that we've hung colored paper from the ceiling to make patrons feel like they're walking into the ocean, or standing under a night sky), but we have a few really cool individual pieces that I'd like to share!


 Miss Beth took on the sphinx, which is currently guarding the entrance to our room. He's made of cardboard, and then he got spruced up with some gold paint and sand.


Here's my King Tut! I seriously think he's the best thing I've ever created, ever. He turned out almost exactly like I wanted him to (probably because I spent way too much time on him). I found a how-to guide in this video, and then put my own spin on it. I'll be putting up a second post detailing exactly how to make this guy, so keep an eye out for that if you're interested!


I also made a mostly life-size mummy! I used the tutorial found here at Miss Stitch a Wish. My brother was kind enough to volunteer as my guinea pig.


As you can tell, he was really happy and excited about it.


Miss Beth turned one of our columns into an Egyptian cat, complete with a beautiful jeweled collar...


...and Miss Jan crafted an obelisk for the opposite side of our entrance! (You can actually see the corner of the sphinx's headdress peeking out from behind the door.)


We also had our summer reading program participants put their name on a camel, and then we stuck said camels up all over the room. (And yes, we had to cut every camel out individually. It took forever, and they are EVERYWHERE.)


See? EVERYWHERE. They border the entire room. (Here's a fun game, feel free to go back and check the other pictures I posted and see how many times you can spot camels. Haha, just kidding, that's not that fun of a game.)


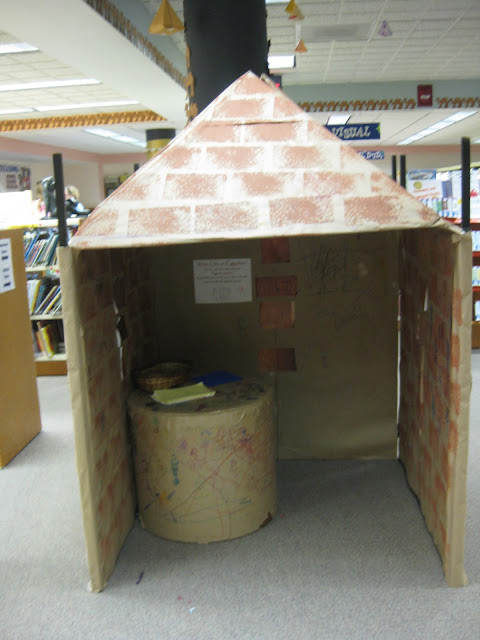
We also made a pyramid - sort of, I'm aware it looks more like a house, but our space was rather limited. Inside we have a table set up with some Egyptian stencils as well as some texture rubbing plates. The kids have really enjoyed it so far! (If you look in the background, please note that there are MORE CAMELS.)


Here is Miss Jan's bulletin board, which comes with awesome 3D pyramids and some truly adorable camels!

And that about wraps it up for the Egyptian portion of the decorations! We also have some really great stack ends made by Miss Kim, but my pictures of those turned out awfully blurry, so I'll try to retake some of them later. HOWEVER, that is not the end of this post, oh no, because we have a few really great non-Egyptian decorations, too!


We got an ant farm! I promise, there are totally ants in there, but they tend to hang out in the lower left corner, or else up at the top, where you can't see them very well. It only took them a couple days to dig those tunnels though, which was really cool to watch!


The ant farm is in a display case Miss Jan put together, which comes complete with books, an outline of a nest, and a few ants making off with a picnic lunch.


Miss Jan also made this awesome dinosaur bulletin board, which I think turned out GREAT.


Sigh, this is blurry as well (I don't know what was up with my camera), but here's a bulletin board I put together. This was actually my spring bulletin board (an oh-so-original "Spring into Reading!"), but I ran out of time to do the one I wanted for summer, so we just switched out the wording. There are also some worms that we have people pin on when they come in to story time, which helps fill in some of the blank space.

And I do believe that's all from me! I'll be posting my King Tut-orial (haha, I'm totally going to make that joke again, JUST SO YOU KNOW) soon, and I'll be following it up with some Wacky Wednesday posts. I'd love to hear what all of you have done to deck out your libraries, so please feel free to link me in the comments!

Friday, May 3, 2013

Flannel Friday: It's Just Emooootions, Taking Me Over

Hello, hello, fellow Flannel Friday-ers! A few weeks ago, I did a flannel board that involved an Angry Bird hiding under an egg. (Thanks, Miss Sarah!) When I revealed the Angry Bird, I asked my story timers to give me their maddest face, which resulted in total hilarity (if you are me). Two-and-three-year-olds with scrunched up grumpy faces are adorable.

Obviously, the next logical step was to do a feelings/emotions story time! We had a lot of fun reading Grumpy Bird and Happy Is..., not to mention our rousing rendition of If You're Happy and You Know It (followed by If You're Sad, Mad, Scared, Sleepy, etc.). For our flannel board, we did expressions - this one was so easy and SO fun, we had a great time with it!


I started out with simple circles with nothing more than eyes. One by one, I'd put up one of the expressionless faces, ask what color it was, and then describe a scenario to my kids. For example: What if your mom and dad gave you a big box and inside the box was a... puppy! How would that make you feel?

Once we'd decided that puppies would make us happy, we talked about how to turn our yellow face into a happy one. The answer, obviously, is with a great big SMILE. (To extend the flannel board a bit, I sometimes put the unhappy mouth on, or the angry eyebrows, so the kids had the chance to tell me how wrong I was.)


Obviously, our sad face required an upside-down mouth and tears.


The red face, of course, could only be ANGRY. And then we all made silly faces!


This was a fun one, too - we talked about how you might feel if you walked into a room and everyone shouted, "HAPPY BIRTHDAY!" I wasn't sure if my group would think of "surprise" on their own, so I made sure to model it by making a surprised expression myself. I asked if your eyebrows go up or down when you're surprised, then we talked about what shape your mouth makes. Then, I followed this up by rephrasing my example: What if you walked into a room and somebody yelled, "BOO!"


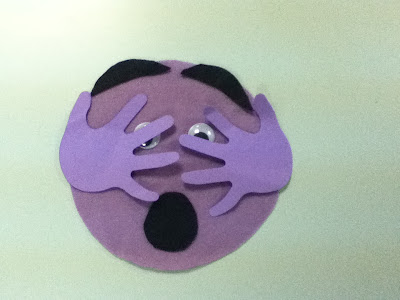
You might be SCARED, which is awfully similar to surprised, so we covered our eyes with our hands to show the difference. Finally, we went through all of the faces that were now up on our flannel board and reiterated how each face was feeling. Then, to finish, I said I felt too bad to leave our sad face feeling sad, so we turned his frown upside down, took away his tears and made him happy instead.


 This was a fun, simple flannel board and a really great way to keep my group engaged and interacting with me. We all had a lot of fun, and I think everyone left happy! :)